Before you can authenticate, you must register your application in the eGain Administration Console to generate a unique Client ID and Client Secret.
Log in to your Administrator Console with a Partition Administrator (PA) account.
Navigate to
Departmentdropdown →Partition→Integration→Client Applicationand click the (+) Add button.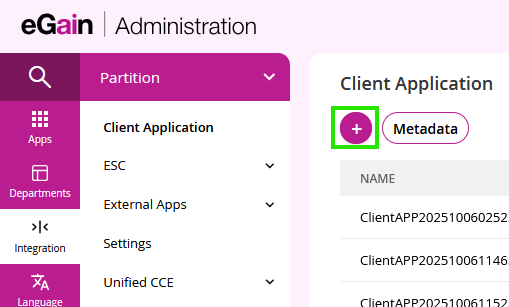
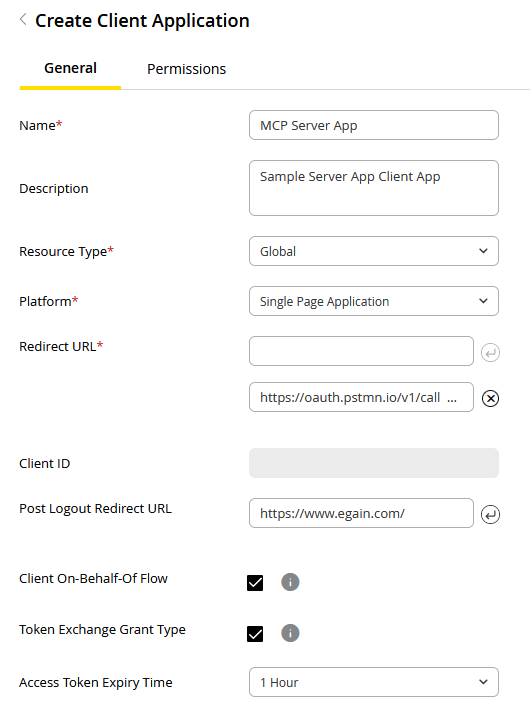
Provide the required information and click Save:
Name: A unique name for your client application.
Resource Type: The resource type accessible by the client application. The only option available is Global.
- Global
Platform: The platform of your client application. The platform you choose determines which OAuth 2.0 flows are available and how your application should handle its credentials.
- Web Application: Select this for traditional server-side applications that can securely store secrets. These are considered confidential clients and use standard authorization flows.
- Single Page Application (SPA): Select this for browser-based JavaScript applications that run entirely on the client side. Since they cannot securely store secrets, they are considered public clients and must use the Proof Key for Code Exchange (PKCE) flow for enhanced security.
The table below outlines key differences between these platform types:
Feature Single Page Application (SPA) Web Applications (Confidential) Environment Devices (browsers for SPAs) Servers Secret Storage Cannot securely store secrets Can securely store secrets OAuth Flow Authorization Code with PKCE Authorization Code Example Mobile apps, browser-based apps Traditional web apps Security Focus Protecting authorization codes without secrets Protecting client secrets - Redirect URL(s): The URL(s) where users will be redirected after granting or denying permission. The pre-registered endpoint to which the authorization server directs the resource owner's user-agent back to the client. This URL is a critical component of the "Authorization Code" grant type.
- Client Responsibility: As the client, you must provide and maintain this endpoint. After the resource owner grants authorization, the authorization server will issue an authorization_code by appending it as a query parameter to the redirect URL.
- Client ID: The Client ID of this client application will be automatically generated after configuration for client application is saved.
- Post Logout Redirect URL: The URL where users are redirected after they sign out of the application.
- Client On-Behalf-Of (OBO) Flow: Enable this checkbox to allow the application to request tokens on behalf of a user. This enables the app to call APIs using the user's existing identity without prompting for additional authentication.
- Configuration: After enabling this flow, navigate to the Permissions tab to grant the necessary OBO delegated permissions to your client application.
- Example: To use the Knowledge Portal Manager APIs with On-Behalf-Of flow, you must enable at least one of the following depending on the scope requirement of the API, see Step 5a for more information:
knowledge.portalmgr.onbehalfof.read: Provides read On-Behalf-Of access to the Knowledge Portal manager.knowledge.portalmgr.onbehalfof.manage: Provides write On-Behalf-Of access to the Knowledge Portal manager.
- Note: Support for the On-Behalf-Of flow varies; verify that your target API supports this. See Step 5a for more information.
- Token Exchange Grant Type: Select this checkbox to enable the ability to exchange an existing token from an external Identity Provider (e.g., Okta, Azure AD) for an eGain access token.
- Access Token Expiry Time: This setting becomes available when Token Exchange is enabled. It allows you to define the validity period for the exchanged token. If left unconfigured, the default expiry is 1 hour.
Generate Credentials:
- Client ID: Automatically generated after saving.
- Client Secret: Generate by clicking
 in the secret table. Important: Copy it immediately; it is only displayed once.
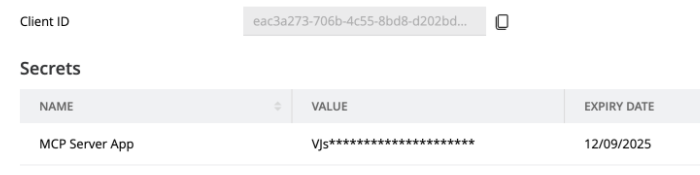
Grant Permissions (Scopes):
a. Determining Scopes:
- To determine which scopes are required, you will need to navigate to all the APIs you want to call and assign those scopes to the client application.

Navigate to your desired API and click on 'View Security Details' - The following supported flows are available in the Security Details panel: oAuthUser, oAuthCustomer, oAuthClient, oAuthOnBehalfOfUser, oAuthOnBehalfOfCustomer, and oAuthAnonymousCustomer. Not all the flows will be available for all API. For each flow, the panel displays:
- Flow type: The grant type used for authentication (for example, authorizationCode).
- Authorization URL: The endpoint used to initiate the authorization request.
- Token URL: The endpoint used to obtain the access token.
- Required scopes: The scope URLs that must be requested in your API call.
In the Security Details panel, switch between the supported authentication flows to view the required URLs and scopes for each flow.
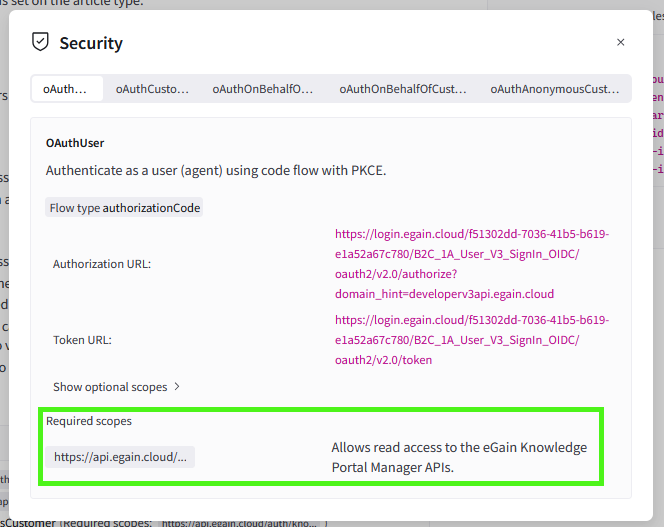
In the Security Details, you can switch between supported flows to see required URLs and Scopes. Hover over the scope URL to see the full required scope URL b. Assigning Scopes:
- In the Admin Console, navigate to Integration > Client Application.
- Select your app and click the Permissions tab. Permissions are organized by Hub (Core, Conversation Hub, and Knowledge) and divided into two types:
- Delegated Permissions: Used when the app acts on behalf of a user.
- Interactive (User/Customer flows): Requires the user to manually log in to provide an authorization code via authorization flow. (e.g.,
knowledge.portalmgr.read/manage). - On-Behalf-Of (OBO) flow: Allows the app to act for a user without an authorization flow. (e.g.,
knowledge.portalmgr.onbehalfof.read/manage).- This flow allows a Client App to obtain a token that carries a user context. Because the token represents a specific user, you must assign and request Delegated Permissions for this flow to function correctly.
- Interactive (User/Customer flows): Requires the user to manually log in to provide an authorization code via authorization flow. (e.g.,
- Application Permissions (Client Credentials flow): Used for where no user is required; the application acts as its own identity.
- Delegated Permissions: Used when the app acts on behalf of a user.
- Select the permissions that correspond to the scopes identified earlier.
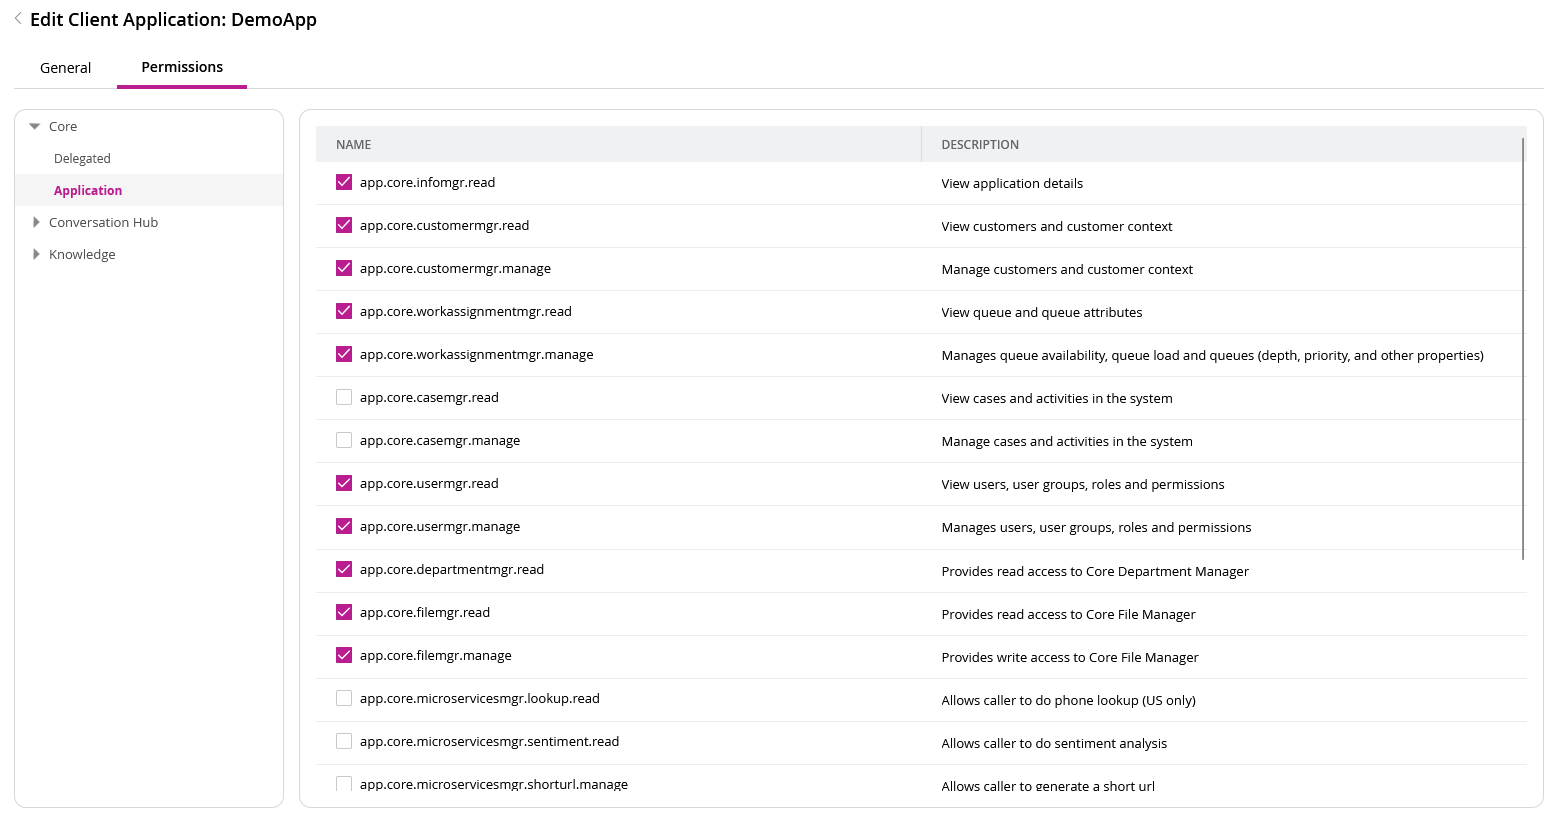
Scopes will be categorized based on Hubs and then Delegated or Application permissions
Important: Assigning vs. Requesting Scopes Assigning permissions makes them available, but they are only included in your access token if explicitly requested in your authentication API call.
Next Steps: