Get up and running with eGain's AI Knowledge Hub APIs in just a few steps. This guide walks you through setting up your account, ingesting content, exploring Knowledge Console, and interacting with REST endpoints to leverage eGain’s advanced knowledge management capabilities.
👉 You can follow the steps below or open the Colab notebook, and you can also watch the video that explains how to use the notebook.
If you don't have an existing eGain account, you can get started with a free trial of eGain's AI Knowledge Hub:
The free trial gives you access to:
- Full AI Knowledge Hub capabilities
- Content ingestion and management
- Search and retrieval APIs
- Portal customization tools
If you already have an eGain account, sign in with your current account to proceed to the next step.
The next step is to ingest your content into the eGain AI Knowledge Hub. There are two primary methods to accomplish this, each catering to different technical needs and data sources.
Prerequisites
- A valid OAuth 2.0 bearer access token with the
app.knowledge.contentmgr.managescope from your eGain environment. - Access credentials and connection details for your data source (for example, an S3 path and credentials or SFTP username and password server details).
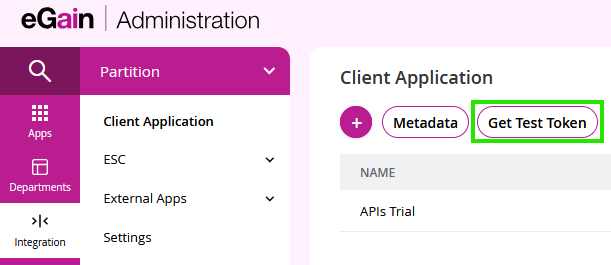
For this guide, generate a test bearer token directly from the client application page.
- Navigate to the Client Application creation screen by going to Department dropdown and selecting
Partitionthen by going to →Integration→Client Application. - Locate and click the Get test token button, found on the right side of the Metadata button.
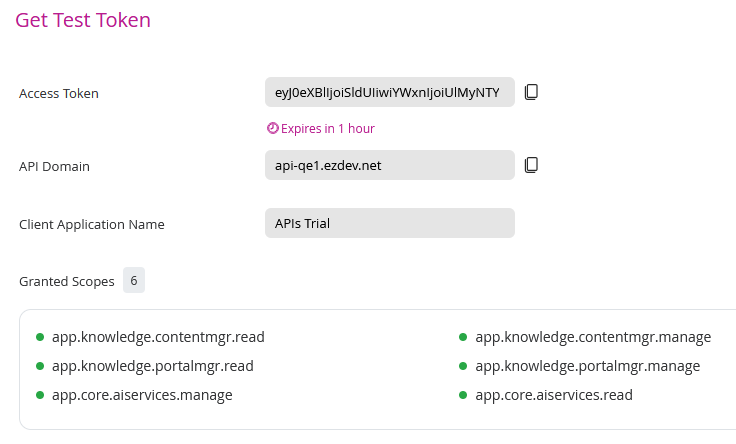
- A response window will open displaying the following details:
- Access Token: A Bearer token valid for testing and its expiration time.
- API Domain: The domain URL required for your API requests.
- Client App Name: The name of the application used (APIs Trial).
- Grant Scopes: A list of permissions granted to this token.
Important: This token is intended for testing and trial purposes only. For production applications, you should create your own Client Application with specific scopes. See the API Authentication Guide for more information.
This method uses a dedicated connector for data sources such as SharePoint, which serves as a specialized wrapper for our general Ingestion API (detailed in Method 2). It simplifies the process by pre-configuring the data source type and requiring only data source specific details for authentication and location without the need to format your data beforehand.
Currently we only support Sharepoint as a data source connector.
https://napsapps.egain.services/tenant/external/ingestion
{
    "languages": [{
        "default": true,
        "languageCode": "en-us"
    }],
    "dataSource": "Sharepoint",
    "sourceConfig": {
        "site": "<YOUR_SHAREPOINT_SITENAME>",
        "host": "<YOUR_SHAREPOINT_HOST>",
        "tenantId": "<YOUR_TENANT_ID>",
        "clientId": "<YOUR_CLIENT_ID>",
        "clientSecret": "<YOUR_CLIENT_SECRET>"
    }
}The following cURL command demonstrates how to start an ingestion job from a SharePoint source. Specifically this will use our published SharePoint source where we will have sample content ready to be ingested into an eGain instance. If you wish to use your own SharePoint data, you should replace all the sample values with your sharepoint instance information when ingesting.
curl -v --location 'https://napsapps.egain.services/tenant/external/ingestion' \
--header 'Content-Type: application/json' \
--header 'Authorization: Bearer <ACCESS_TOKEN>' \
--data '{
    "languages": [
        {
            "default": true,
            "languageCode": "en-us"
        }
    ],
    "dataSource": "Sharepoint",
    "sourceConfig": {
        "site": "EightBankKnowledgePortal",
        "host": "eightbank.sharepoint.com",
        "tenantId": "1442c167-8146-4361-b462-b6fb26a6cf75",
        "clientId": "ce05764b-bcec-4c17-b538-76f4db921dff",
        "clientSecret": "g5W8Q~DJVFpHDJdNn2-jFg6TjSvlACPYvk8MHaEH"
    }
}'This method provides maximum flexibility and is ideal for automation and integration with your existing infrastructure. The Ingestion API allows you to pull content from a data source that you own and manage, such as an AWS S3 bucket or a secure SFTP server. To enable access to your content, you must provide the API with the correct path and any required credentials.
Sample Data
You may use our Sample Data Source, which is already formatted, or you may use your own content to be ingested. The sample is only available as a .zip file, which you must download and upload to your own data source location. The API does not accept a .zip file path; it requires the full extracted file structure.
Prerequisites
Before using the Ingestion API, ensure the following requirements are met:
- Content is correctly formatted into the required file structure. For more details, see the Data Import Format Guide.
Important Note: It is highly recommended to validate your content before importing using the Validation API. This serves as a “dry run” that checks the entire content package for formatting issues, incorrect paths, and other potential errors without actually importing any data. Performing this step can save significant time and help prevent failed jobs.
To know more, see: Guide: Validating Content Before Import
API Endpoint
To start an ingestion job, make a POST request to the following endpoint:
https://${API_DOMAIN}/knowledge/contentmgr/v4/import/content
Example Request (AWS S3)
The request body must be a JSON object specifying your data source details, the operation, and an optional schedule.
{
  "dataSource": {
    "type": "AWS S3 bucket",
    "path": "s3://your-company-bucket/path/to/content",
    "region": "us-east-1",
    "credentials": {
      "accessKeyId": "YOUR_AWS_ACCESS_KEY_ID",
      "secretAccessKey": "YOUR_AWS_SECRET_ACCESS_KEY"
    }
  },
  "operation": "import",
  "scheduleTime": {
    "date": "2024-03-01T10:00:00.000Z"
  }
}curl -v --location --request POST 'https://<API_DOMAIN>/knowledge/contentmgr/v4/import/content' \
--header 'Authorization: Bearer <ACCESS_TOKEN>' \
--header 'Content-Type: application/json' \
--data-raw '{
"dataSource": {
"type": "AWS S3 bucket",
"path": "s3://your-bucket-name/your-folder/content",
"region": "your-aws-region",
"credentials": {
"accessKeyId": "YOUR_AWS_ACCESS_KEY_ID",
"secretAccessKey": "YOUR_AWS_SECRET_ACCESS_KEY"
}
},
"operation": "import"
}'(For details on using a Shared File Path, see our Shared Path Ingestion Guide.)
When you successfully submit an API request using either Method 1 or Method 2, the system queues the import job and returns a 202 Accepted status code.
The key piece of information in the response is the Location header. This header contains a unique URL path that you will use to check the status of your import job.
The Location header provides the specific path to the status of your job.
The structure of the URL path in the Location header will differ depending on the API method you used:
Example Location Response for Method 1 (External Connector Ingestion API):
location: tenant/external/ingestion/7A84B875-6F75-4C7B-B137-0632B62DB0BD/status
Example Location Response for Method 2 (Ingestion API):
location: knowledge/contentmgr/v4/import/content/7A84B875-6F75-4C7B-B137-0632B62DB0BD/status
This path also includes a unique Job ID.
Example Job ID: 7A84B87-6F75-4C7B-B137-0632B62DB0BD
To get the status of your import job, you need to construct a Job Status Endpoint and send a GET request to it.
Create the full Job Status Endpoint by combining the API domain with the location path you received in the response.
For Method 1 (External Connector Ingestion API): The API domain is always
https://napsapps.egain.services.Example Job Status Endpoint:
https://napsapps.egain.services/tenant/external/ingestion/7A84B875-6F75-4C7B-B137-0632B62DB0BD/statusFor Method 2 (Ingestion API): Use the same API domain that you used for the initial import request.
Example Job Status Endpoint:
https://<YOUR_API_DOMAIN>/knowledge/contentmgr/v4/import/content/7A84B875-6F75-4C7B-B137-0632B62DB0BD/status
Use the following cURL commands to send a GET request to your constructed Job Status Endpoint. Remember to replace <JOB_STATUS_ENDPOINT> with your crafted Job Status Endpoint and <ACCESS_TOKEN> with your valid token.
curl -v --location --request GET '<JOB_STATUS_ENDPOINT>' \
--header 'Authorization: Bearer <ACCESS_TOKEN>' \
--header 'Content-Type: application/json' \
After the import job has completed successfully, the content becomes available in eGain.
Note: After a successful import, please allow for a brief delay before the content is fully available for use. The system's search service synchronizes all new and updated content every 30 minutes.
Once your content import is complete, you can access and manage your imported content within the Knowledge Console.
- Log in to your AI Knowledge Hub instance using your credentials.
- In the Knowledge Console, navigate to Articles > Folders > Mirrored Content > SharePoint.
- The folder structure is automatically imported and organized to match your SharePoint hierarchy.
- Browse through the folders to view your articles.
In the Knowledge Console, you can perform the following actions to manage your articles:
- Manage: Edit, update, or organize your knowledge articles.
- Search: Use the built-in global search functionality to find specific articles.
- Browse: Access automatically generated topics created through Topics from Folders. All mirrored articles are organized under these topics and displayed in 'Portal Zero' by default. You can also create a new portal and include selected topics from folders to view your content in a customized way.
- Preview: While editing an article, use the 'Preview in Portal' option to see how the content appears within a selected portal before publishing.
Personalize your knowledge portal to reflect your brand identity:
- Log in to your eGain AI Knowledge Hub instance as a Knowledge Manager.
- In the Knowledge Console, navigate to Publishing > Themes.
- Under the Default Themes section, click the Customize button to create a new theme.
- In the theme workspace, you can select the portal you want to modify and select the target audience.
- Use the Global and Page settings to customize colors, fonts, page layouts, and upload your logo or other brand assets to align with your brand guidelines.
- Preview your updates in real time as you make changes.
- Once satisfied, publish the theme to apply it to your portal and make it live for your users.
The knowledge portal provides the following features to help you consume and manage your knowledge more efficiently:
- Responsive Design: Optimized for both desktop and mobile devices.
- Advanced Search: Powerful search capabilities to quickly find relevant content.
- Content Organization: Supports categorization and tagging for easier navigation.
- Multi-Language Support: Provides content in multiple languages to serve diverse user bases.
Along with accessing your newly imported content in the Knowledge Console, you can now also integrate with our AIS and Portal Manager APIs to power intelligent search and retrieval experiences.
- Answers API: Retrieves the most relevant content for a given user query and provides curated content chunks to the LLM to generate a natural language answer.
- Retrieve API: Returns content chunks directly related to a given user query. Ideal for building custom LLM integrations where you want full control over how answers are generated.
- Search API: Delivers ranked and relevant search results from your knowledge base, helping users quickly find the information they need.
Below are example CURL requests that demonstrate how to use these APIs in action:
Prerequisites
- A valid OAuth 2.0 access bearer token with the
app.knowledge.portalmgr.read app.core.aiservices.readscopes from your eGain environment. You must first set up a client application and acquire an access token. Our API Authentication Guide provides detailed instructions on how to Step 1: Create a Client Application and Step 2: Find Your API Endpoints (Metadata). You will then use the Client Credentials Flow from Step 3 to obtain the necessary Bearer token for authentication. - Replace the placeholder <YOUR_PORTAL_ID> and <YOUR_LANGUAGE_CODE> with correct values, for example, PZ-9999 and en-US respectively.
curl -i -X POST \
    'https://<API_DOMAIN>/core/aiservices/v4/<YOUR_PORTAL_ID>/answers?q=How%20do%20credit%20cards%20work%3F&%24lang=<YOUR_LANGUAGE_CODE>' \
   -H "Content-Type:application/json" \
   -H "Authorization:Bearer <ACCESS_TOKEN>"
This request retrieves a generated answer for the query “How do credit cards work?”, using the Answers API, which combines retrieval and LLM generation to return a concise, contextually relevant response.
curl -i -X POST \
    'https://<API_DOMAIN>/core/aiservices/v4/<YOUR_PORTAL_ID>/retrieve?q=How%20do%20credit%20cards%20work%3F&%24lang=<YOUR_LANGUAGE_CODE>' \
   -H "Content-Type:application/json" \
   -H "Authorization:Bearer <ACCESS_TOKEN>"
This request retrieves the relevant content chunks for the query “How do credit cards work?”, allowing you to build your own LLM-based answer generation or content analysis workflow.
curl -i -X GET 'https://<API_DOMAIN>/knowledge/portalmgr/v4/<YOUR_PORTAL_ID>/search?q=How%20do%20credit%20cards%20work%3F&%24lang=<YOUR_LANGUAGE_CODE>' \
    -H "Content-Type: application/json" \
    -H "Authorization: Bearer <ACCESS_TOKEN>"
This request retrieves ranked search results from your knowledge base for the query “How do credit cards work?”, providing metadata and relevance scores.
Now that your content is ingested and accessible, you are ready to build powerful applications leveraging eGain's Search, Retrieve, and Answer APIs. These APIs enable you to deliver intelligent search experiences and generate AI-powered answers for your users.
- Review the Authentication Guide to learn how to securely connect to the eGain APIs using OAuth 2.0 and manage access tokens.
- Explore the Guides, SDKs, APIs for detailed documentation.
- Try out our Reference Implementations on GitHub.
- Reach out to us and your felow developers on Developer Community